This post may contain affiliate links.
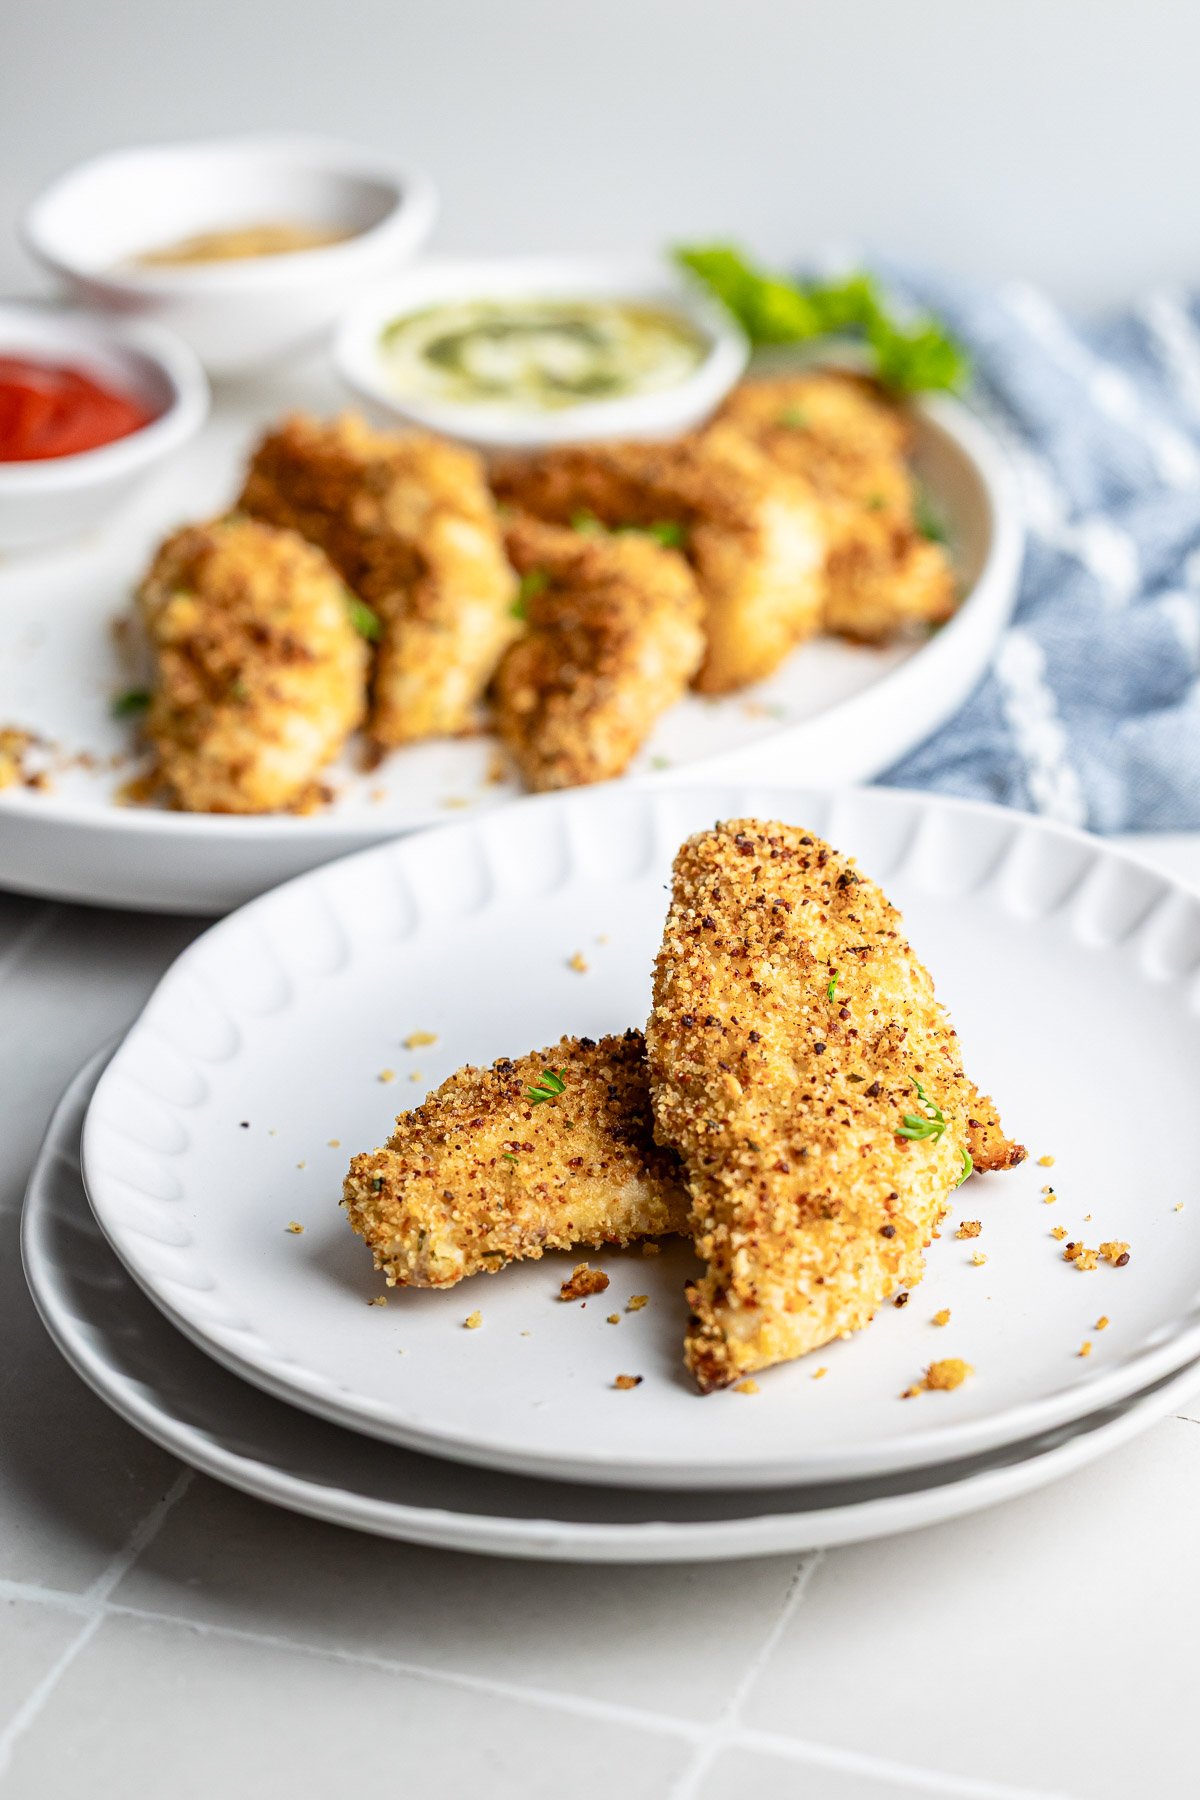
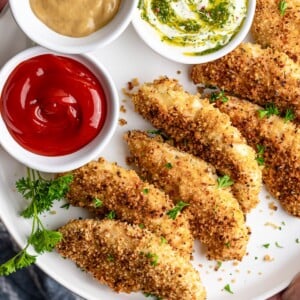
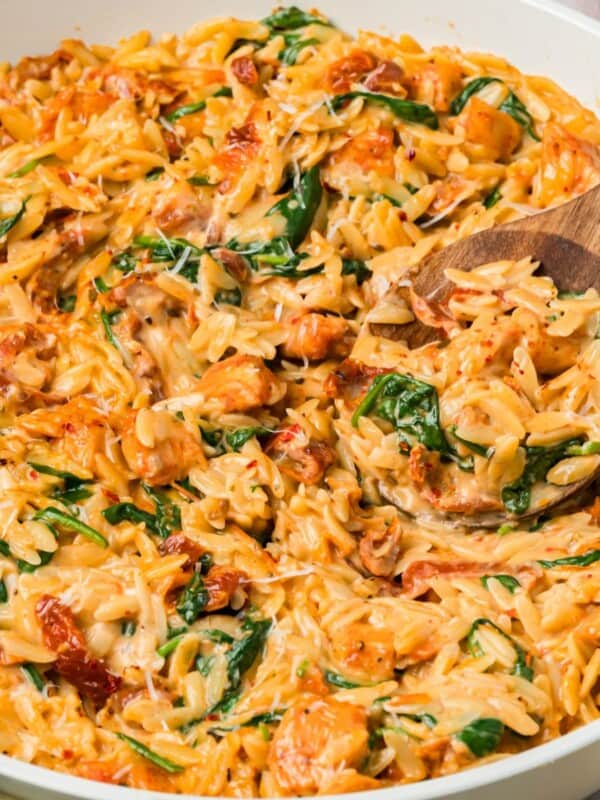
These Easy Baked Chicken Tenders come out golden and juicy every time, no frying, no splatter, no soggy bottoms. A panko-Parmesan crust, an olive oil dredge, and a wire rack are all it takes to get that crunchy coating straight from the oven. My family has made these on repeat since my oldest was a toddler, and they’ve survived every picky eater phase since.

These crispy baked chicken tenders are ready in 35 minutes and come out golden, juicy, and crunchy every time, no frying, no splatter, no soggy bottoms. A panko-Parmesan coating and a simple olive oil dredge are all it takes to get that crispy-on-the-outside, tender-on-the-inside result straight from the oven.
My family has made these on repeat since my oldest was a toddler, and they’ve survived every picky eater phase since. They’re easy enough for a hectic Tuesday and impressive enough to set out at a party. Toss them in a wrap, serve them over a grain bowl, or keep a stash in the freezer for effortless weeknight dinners and packed lunches all week. For a faster version, try my Air Fryer Chicken Tenders.
Why This Recipe Works

• Panko + Parmesan crust: Panko breadcrumbs have a larger, flakier texture than regular breadcrumbs, which means more surface area to crisp up. The Parmesan melts into the coating and helps it brown faster without burning.
• Olive oil dredge instead of egg: Most recipes use egg as the binder, but a thin coat of olive oil gives you a lighter, crispier result. It lets the breadcrumbs toast rather than steam.
• Wire rack + 400°F: Hot air circulates under and around each tender, so the bottom crisps just as well as the top. No flipping required for even browning, though a halfway flip deepens the color.

Ingredients You’ll Need

These simple pantry staples are all you need. See the recipe card below for exact amounts and printable instructions.
- Chicken Tenderloins – Lean and cook quickly. You can also use sliced boneless chicken breasts, cutlets or chicken thighs. The cook time will vary depending on how thick the chicken is.
Panko Breadcrumbs – Makes the crunchiest crust. Regular crumbs work, or swap in crushed cornflakes, pretzels, Ritz, or saltines. For gluten free chicken tenders, use gluten-free panko. - Parmesan Cheese – Adds savory depth and helps the coating brown nicely. You can sub in shredded mozzarella, or try nutritional yeast (like Bragg’s Roasted Garlic) for a dairy-free, umami-rich swap.
- Garlic Powder, Thyme, Paprika, Parsley – This spice blend keeps the chicken flavorful without being overpowering; feel free to tweak based on your family’s preferences. I also like adding in spices like za’atar, Italian seasoning or cayenne pepper for spice.
- Olive Oil (or egg) – Helps the breadcrumb coating adhere. Egg will give a slightly richer coating, while oil helps add crispness.
How to Bake Chicken Tenders
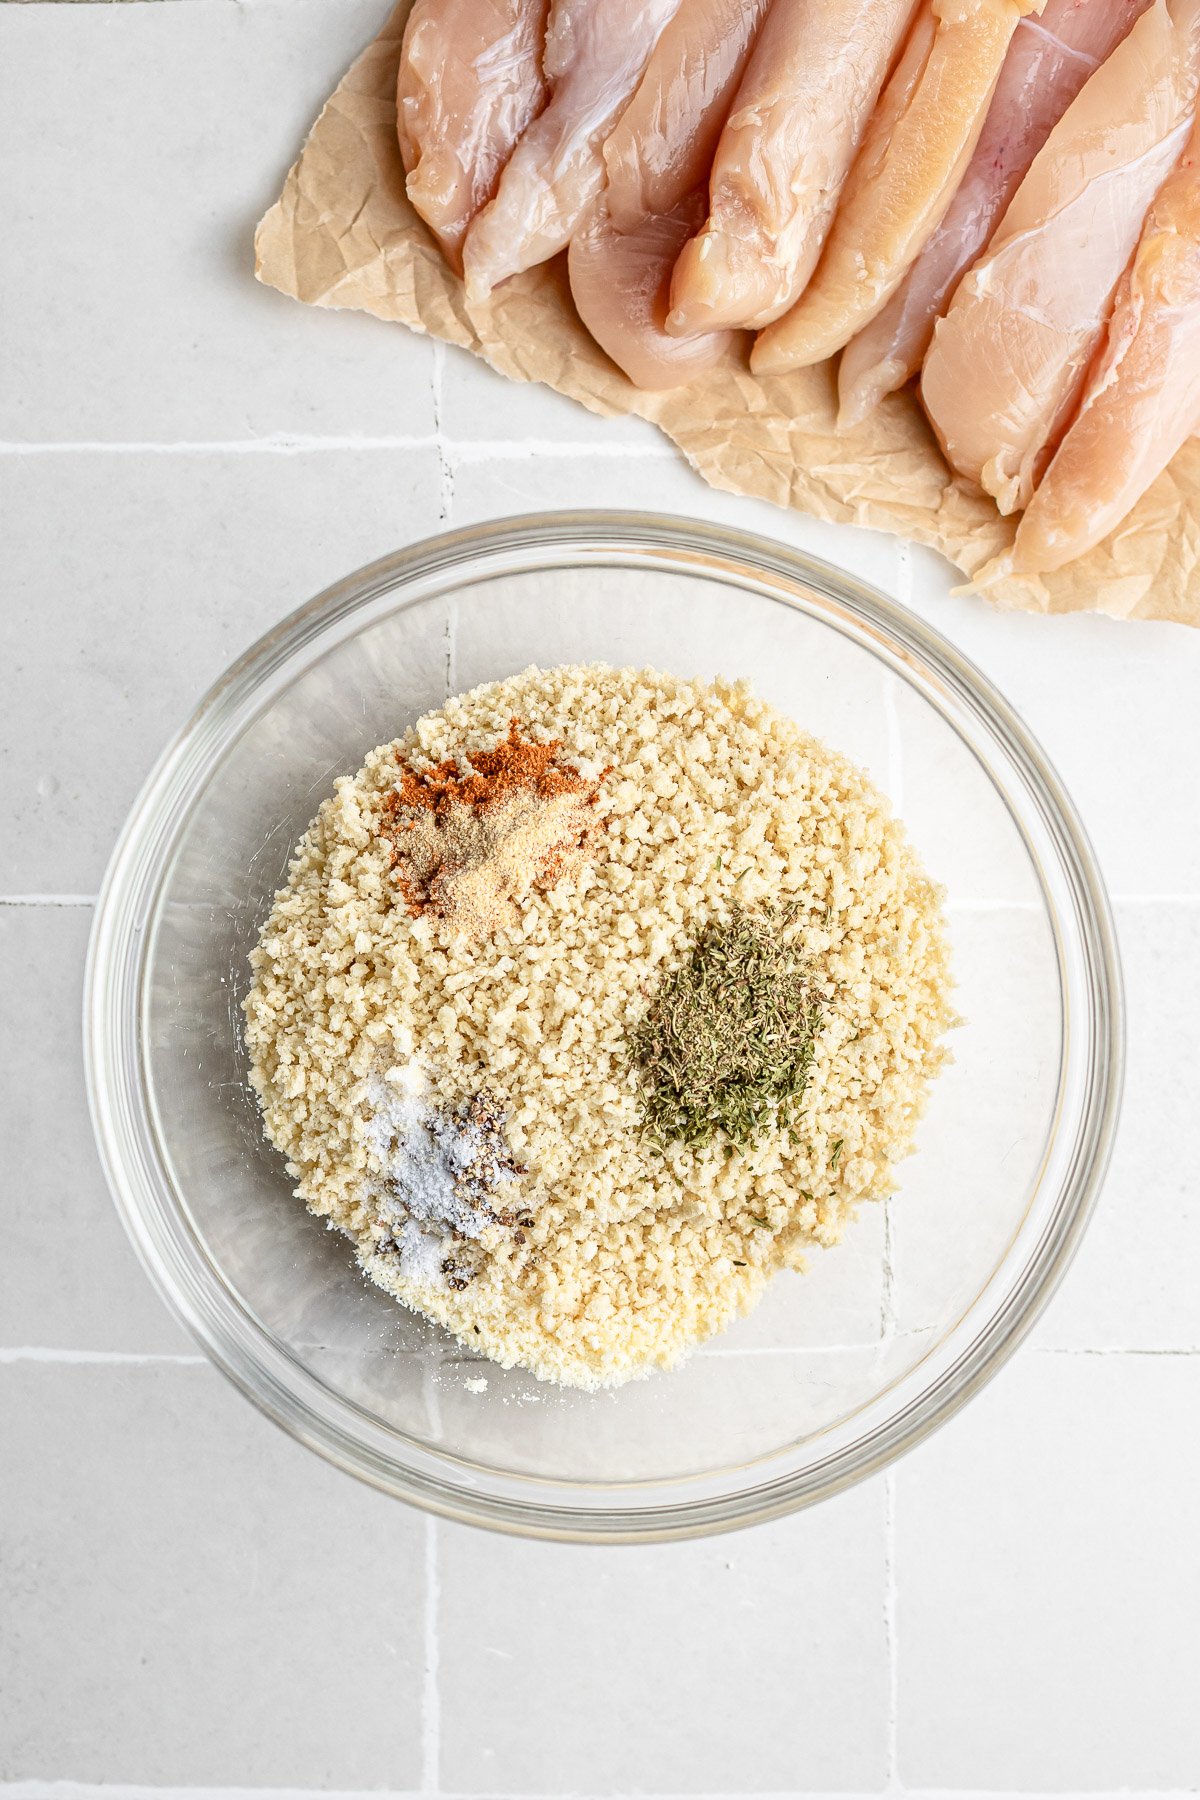
Step 1: Preheat your oven to 400°F. If you have a wire rack, place it on top of a baking sheet for extra-crispy results. In a shallow bowl, combine the panko, Parmesan, garlic powder, thyme, paprika, parsley, salt, and pepper. Mix well.
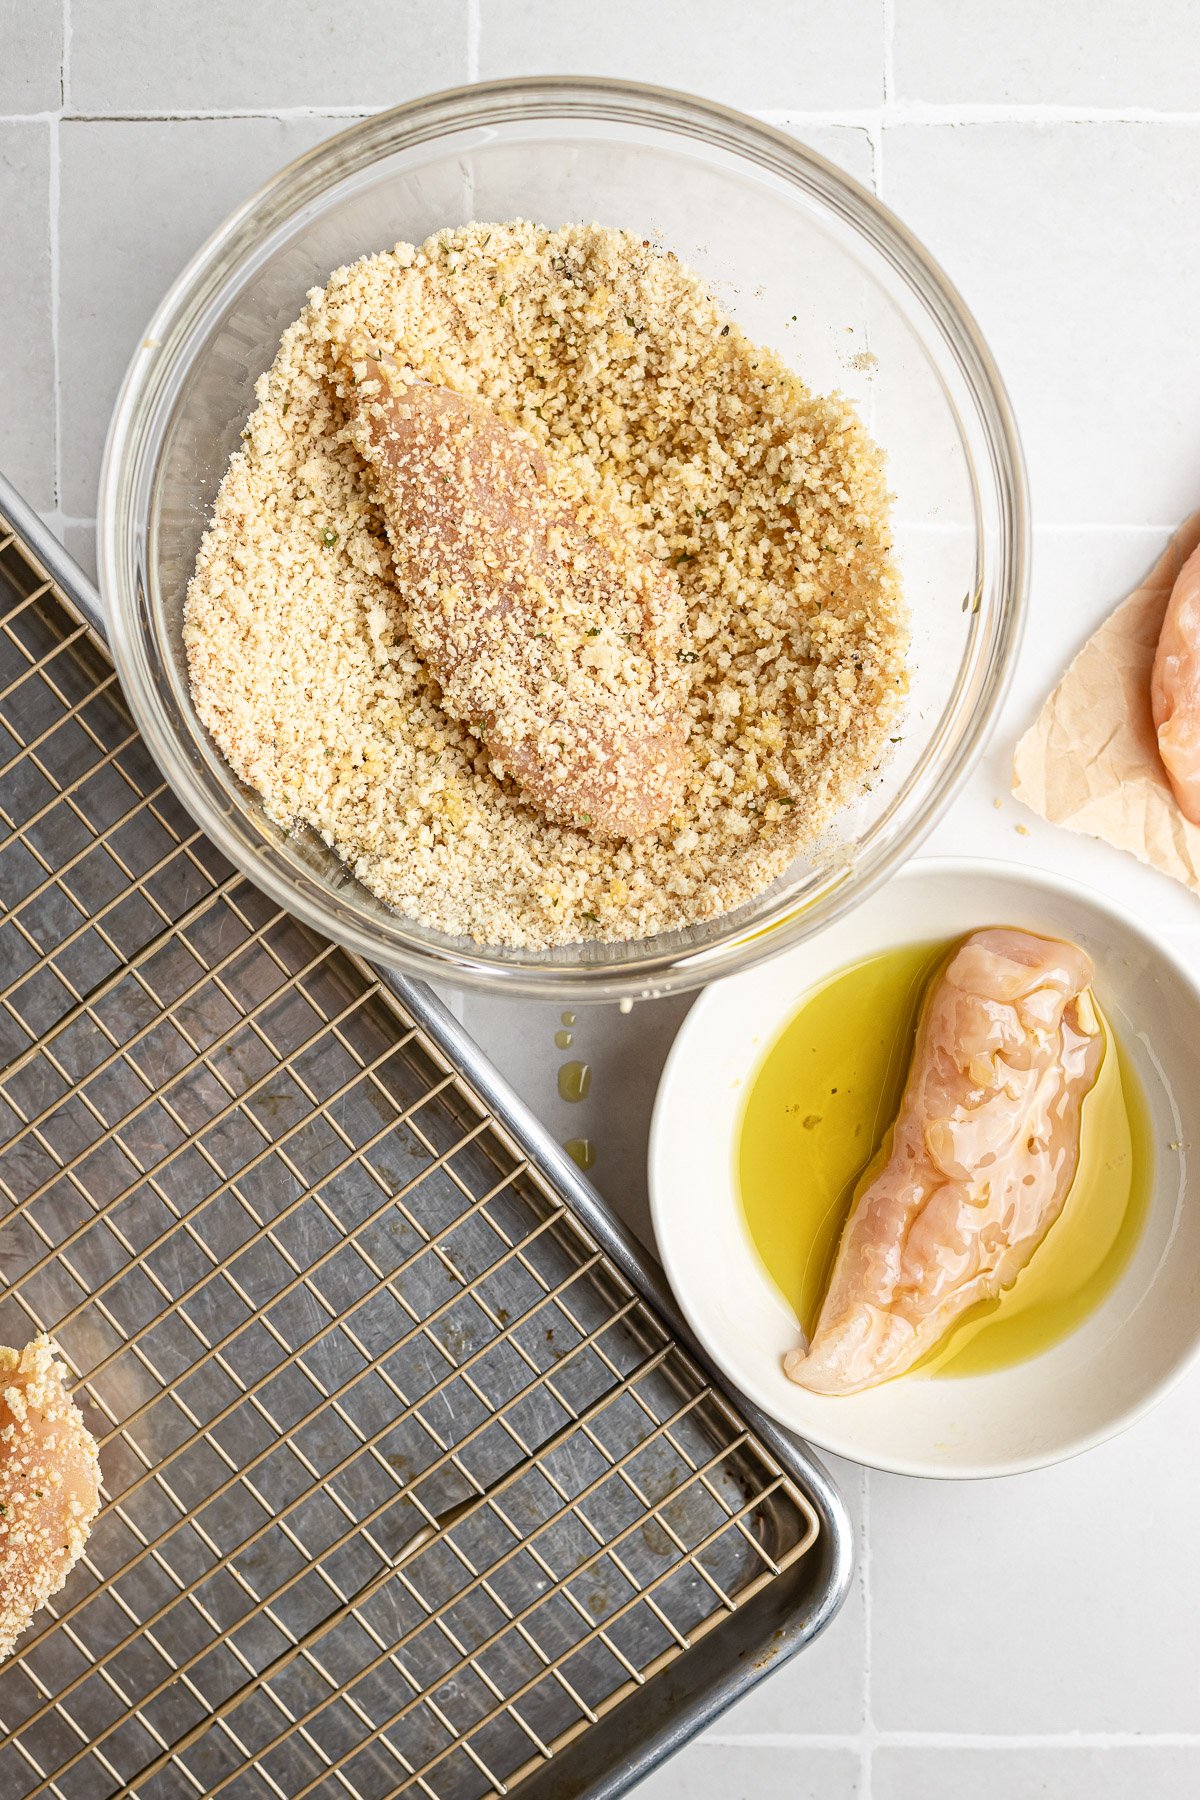
Step 2: In another shallow dish, pour in the olive oil (or beat one egg if using). Dredge each chicken tender in the oil or egg mixture, then coat it in the breadcrumb mixture. Press lightly to help the coating stick.
Why 400°F + wire rack = fryer-level crunch: The high heat sends hot air all around the chicken, quickly toasting the breadcrumbs. The rack lets steam escape instead of getting trapped underneath. This way, the coating turns golden and crunchy before the meat has a chance to dry out.
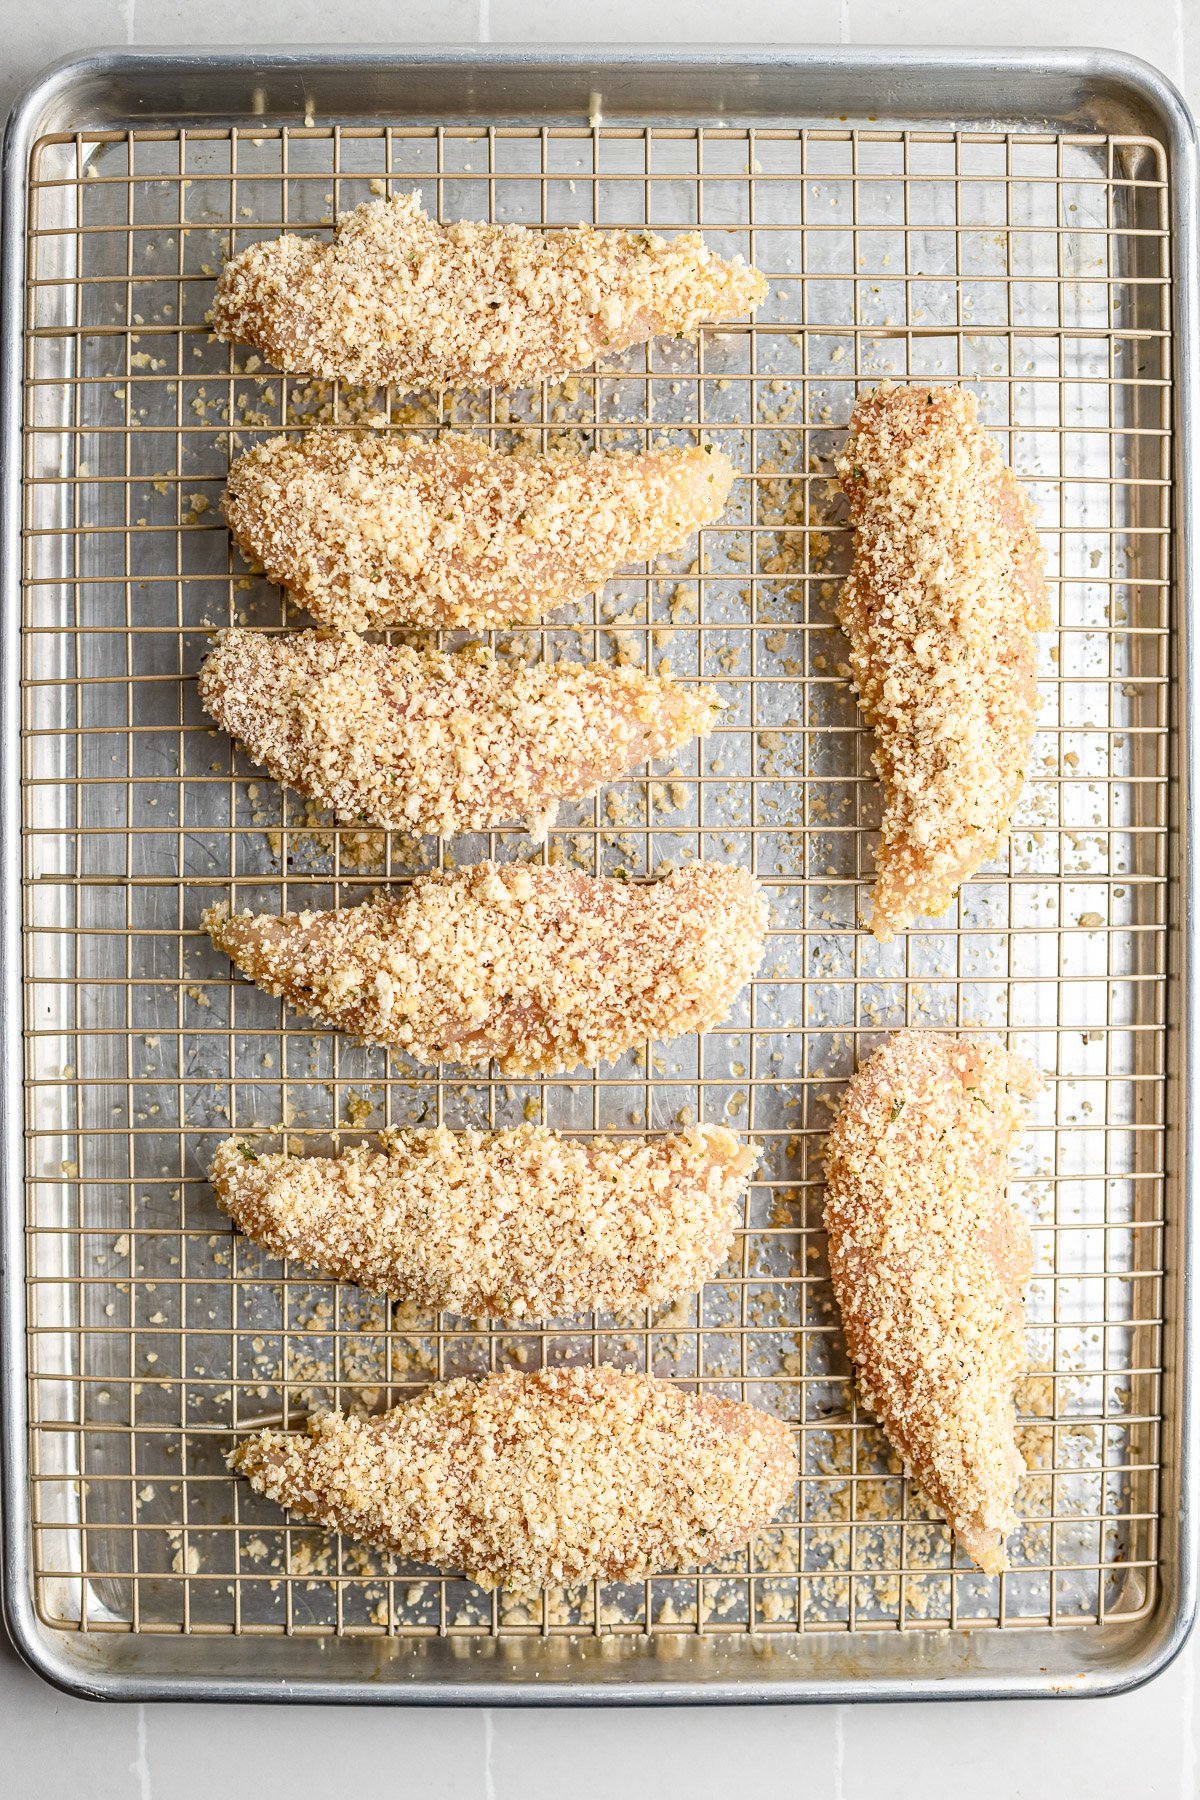
Step 3: Place tenders on the prepared baking sheet pan. Bake for 25 minutes, flipping once halfway through, until the chicken is golden and reaches 165°F internally.
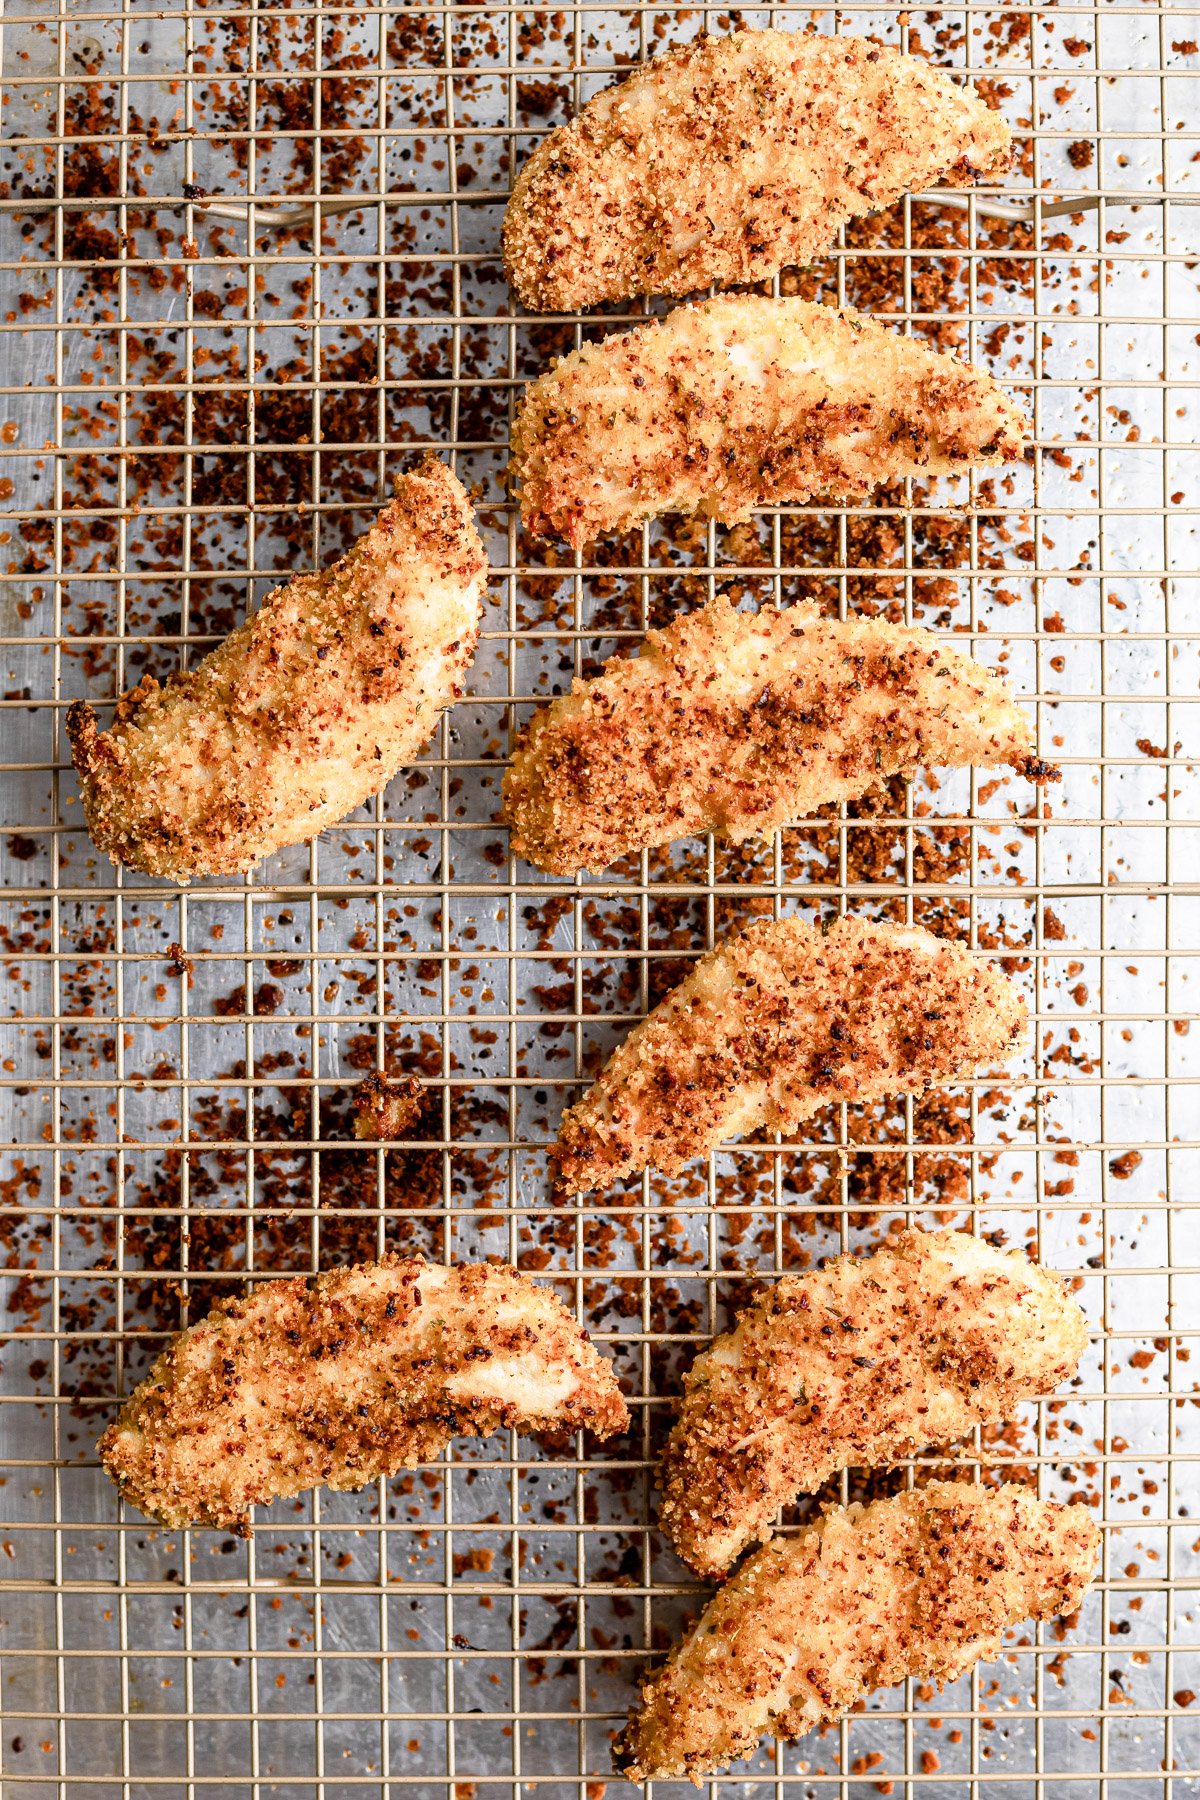
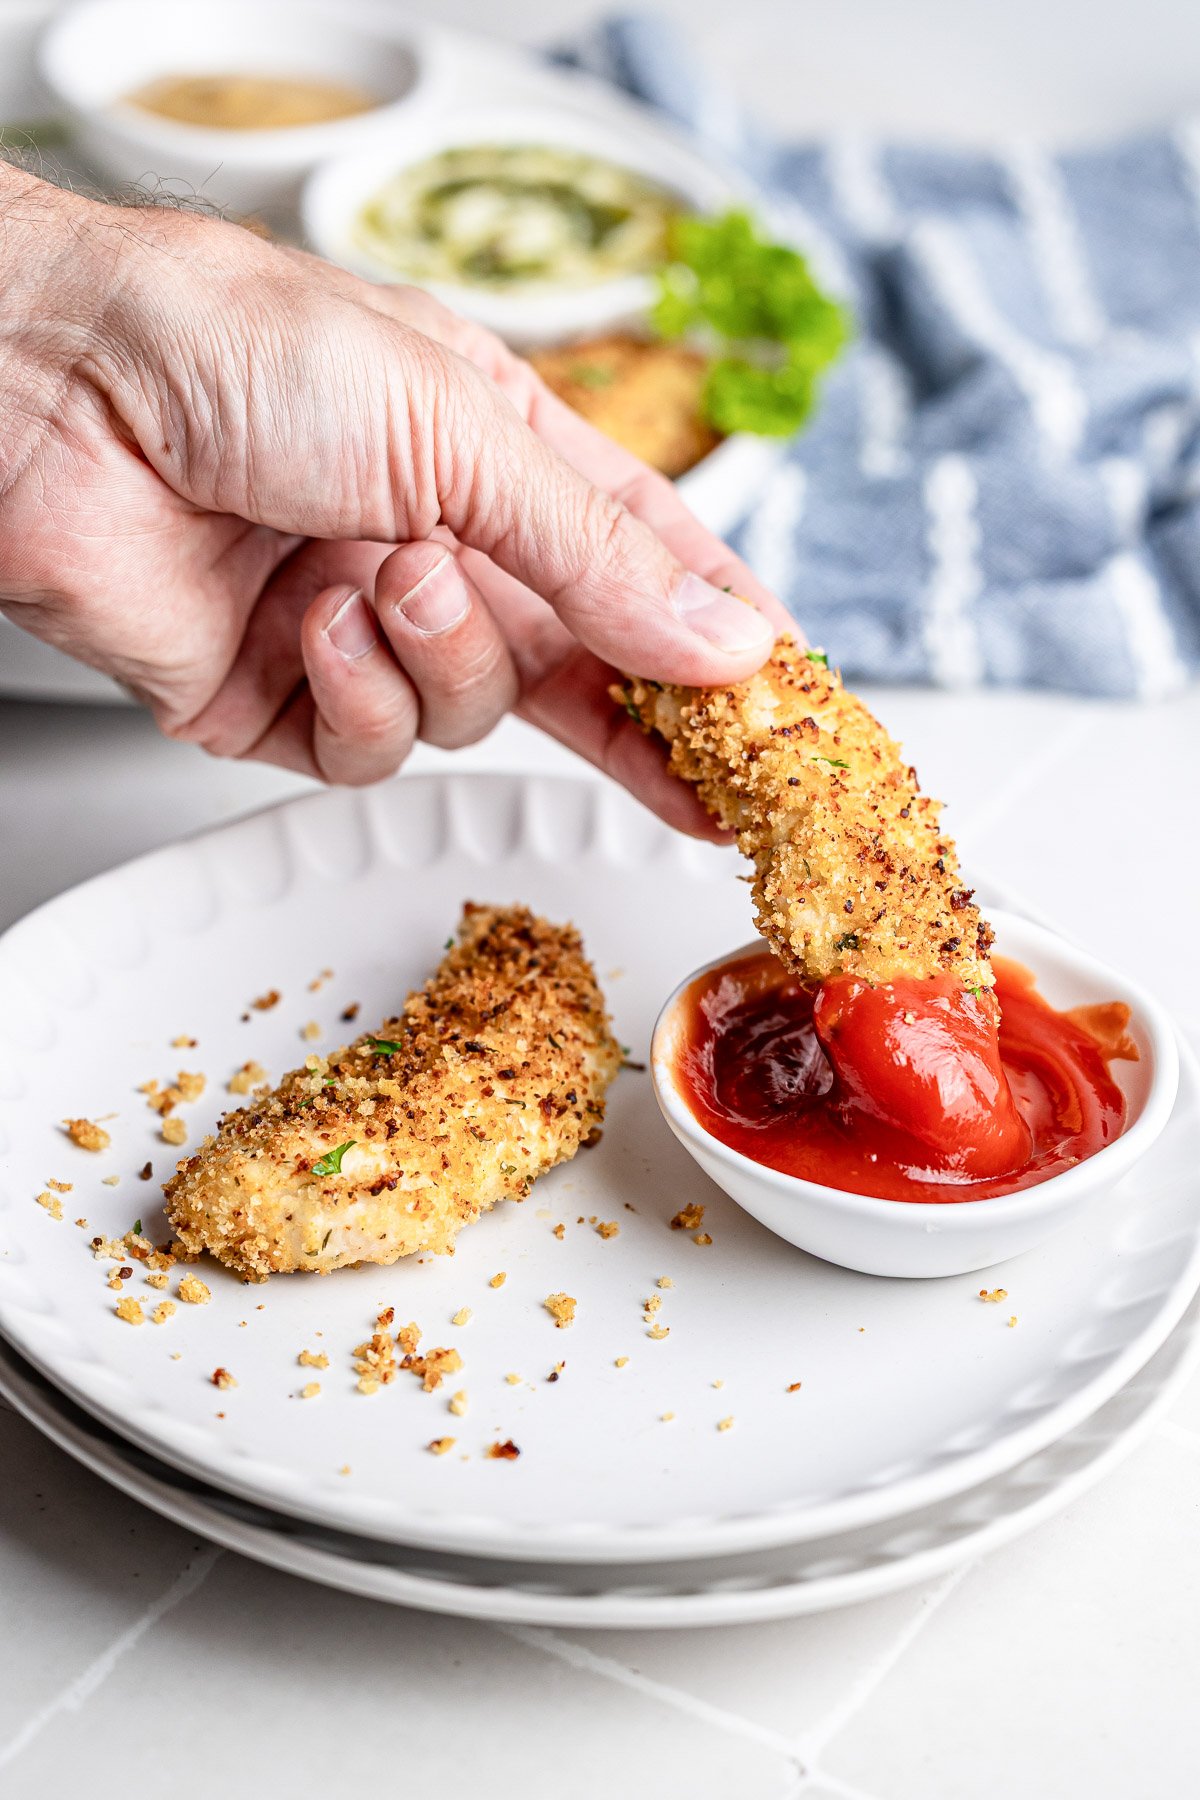
Step 4: Serve warm with dipping sauces (see suggestions below), or let cool and store in an airtight container for up to 5 days.
Recipe Tips for Best Results
- If you’ve had trouble with breading falling off in the past, here’s a fix: 1. Pat your chicken dry before dredging. 2. Let the coated tenders chill in the fridge for 10–15 minutes before baking. This helps everything stick better and stay crisp.
- Looking for an oil-free or egg-free option? You can use plain Greek yogurt or even a thin layer of mayo to help the breadcrumbs adhere while adding moisture and flavor.
- Use a wire rack: This allows air to circulate and keeps the bottoms from getting soggy. Space out the chicken tenders evenly on the baking sheet to promote even cooking.
- Olive oil spray: Lightly spritz the tenders before baking for added crisp.
- Let the breading set: Chill the coated tenders for 10–15 minutes before baking if you have time. It helps the coating stick better during baking.
If you like these oven baked chicken tenders try my Air Fryer Coconut Chicken Tenders, Pretzel Crusted Chicken Recipe or these Crispy Coconut Chicken Tenders (Baked + Kid-Approved).
Extra Crispy Tricks
Want your baked chicken tenders to come out extra golden and crunchy? These tips (based on reader feedback and kitchen tests) can help you troubleshoot common crispiness issues:
- Spray with oil before baking (not after): Lightly spritz tenders with olive oil or avocado oil spray before baking to help the crumbs brown evenly. Spraying after can add more fat without crisping.
- Use a wire rack: This lets heat circulate around the tenders and prevents soggy bottoms. If you don’t have one, flip halfway and bake directly on a parchment-lined tray.
- Broil at the end: For darker browning, try broiling the last 2–3 minutes. Keep a close eye to avoid burning.
- Try toasted panko: Pre-toast your breadcrumbs in a dry skillet or 400°F oven for 3–5 minutes before coating.
- Don’t overcrowd the pan: Give each tender space to breathe. Overcrowding traps steam and softens the coating.
- Optional swap-ins: Try using crushed cornflakes, pretzels, or Ritz crackers in place of some breadcrumbs for added crunchy coating and flavor.
- Save extra crumbs for flipping: A reader tip! Save a few tablespoons of the breadcrumb mixture to sprinkle on top after flipping midway through baking for an extra layer of crisp.
These easy tweaks are totally optional, but if you’re chasing that extra-crispy, golden finish, they’ll get you there!

Best Dipping Sauces
- Honey Mustard Sauce – Sweet and tangy
- BBQ Sauce – Smoky and classic
- Ranch Dressing – Cool and creamy
- Creamy Dill Sauce – Herbaceous and fresh
- Tahini Yogurt Dressing– Garlic yogurt Mediterranean dip
- Tzatziki Sauce – creamy, dill sauce
Ways to Serve Parmesan Chicken Tenders
Want to go beyond the usual sides? These baked tenders are great tucked into pita with hummus, sliced over a grain bowl, or added to a lettuce wrap with a drizzle of hot honey.
- In wraps or sandwiches with lettuce, tomato, and a swipe of mayo.
- Chopped over salads like this Lemon Arugula Salad for an easy protein boost.
- Tucked into tacos or burritos with pickled red onions.
- Tossed with pasta and veggies.
- Added to a stir-fry with quick-cooked vegetables.
Make-Ahead Tips for Parties
Need to feed a crowd? These baked chicken tenders are perfect for sliders, wraps, or a party platter.
- Serve with mini buns, sauces, or add to a salad bar setup for easy customization.
- You can bake them earlier in the day and reheat in the oven or air fryer at 300°F.
- For best texture, spray lightly with olive oil before reheating to restore crispiness.
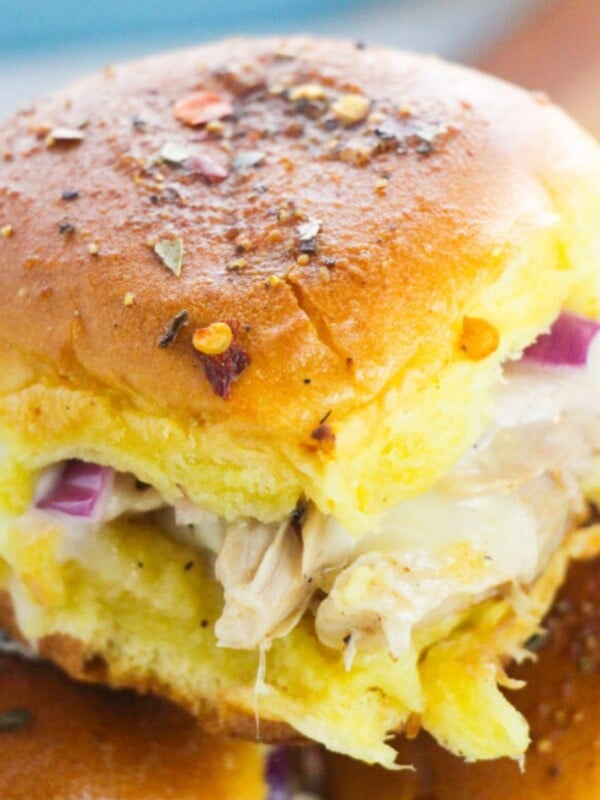
- You can add them to these Parmesan Chicken Tender Sliders.
Storage Instructions
- Storage: Store leftover chicken strips in an airtight container for up to 5 days. To reheat leftovers, bake or air fry at 375°F until warmed and re-crisped. Avoid microwaving, which softens the coating.
- To freeze after baking: Cool the cooked tenders completely, then wrap individually in foil or store in a single layer in a freezer-safe container. Reheat in the oven or air fryer at 375°F until crisp and heated through.
- To freeze before baking: Line a tray with parchment paper and place the dredged but uncooked tenders on it in a single layer. Freeze for 2 hours, then transfer to a freezer-safe bag. Bake from frozen at 375°F for 25–28 minutes, or until the internal temperature reaches 165°F.
Recipe FAQs
Three things make the biggest difference: panko breadcrumbs (larger flakes, more crunch than regular breadcrumbs), a wire rack (so heat hits the bottom too), and a light spray of olive oil before baking. For extra crunch, pre-toast the panko in a dry skillet for 2 to 3 minutes before coating the chicken. Bake at 400°F and flip once halfway through. Avoid microwaving leftovers, reheat in the oven or air fryer at 375°F to bring the crisp back.
Absolutely. Use your favorite gluten-free breadcrumb or crushed rice cereal for a similar crunch.
Yes! Here’s my recipe for Air Fryer Chicken Tenders. Prepare the chicken tenders as directed, then place them in a single layer in your air fryer basket. Cook at 400°F for 10–12 minutes, flipping halfway through, until golden and cooked to 165°F internally. Use olive oil spray to help the coating crisp up even more.
More Chicken Recipes

Tried this recipe? Leave a star rating and comment below! Subscribe to my newsletter or follow me on Facebook, Instagram, or Pinterest for the latest.
Easy Baked Chicken Tenders (Extra Crispy!)
Video
Ingredients
- 1 1/3 cup panko breadcrumbs , {or you can use regular breadcrumbs}
- 1/4 cup grated Parmesan cheese, {or use mozzarella cheese}
- 1/2 teaspoon garlic powder
- 1/4 teaspoon thyme
- 1/4 teaspoon dried parsley
- 1/4 teaspoon paprika
- 1/2 teaspoon salt
- 1/8 teaspoon pepper
- 1 1/2 pounds chicken tenderloins
- 1/4 cup extra virgin olive oil, or you can use egg or avocado oil
Instructions
- Preheat oven to 400 degrees. Spray a baking sheet with nonstick cooking spray or you can use a wire rack on top of the baking sheet which helps ensure the tenders are crispy.
- In a shallow bowl mix the panko breadcrumbs, Parmesan cheese, garlic pwoder, thyme, parsley, paprika, salt and pepper and stir until combined. Set aside.
- Pour the 1/4 cup olive oil into another shallow bowl and set aside.
- Optional: Pat the chicken dry with paper towels before dredging, and let the coated tenders chill in the fridge for 10–15 minutes before baking. This helps everything stick better and stay crisp.
- Dredge the chicken in the olive oil and then into the panko breadcrumb mixture making sure both sides are coated. Place the tenders on the baking sheet or wire rack.
- Place the chicken tenders in the oven and bake for 25 minutes, flipping the tenders halfway through cooking {chicken should reach an internal temperature of 165 degrees F}.
- Sprinkle with fresh parsley if you want and serve warm with honey mustard, ketchup or ranch dipping sauce.
Notes
- Wire rack: Place a wire rack on top of your baking sheet so heat circulates under and around each tender. This keeps the bottoms crispy instead of steaming against the pan.
- Olive oil dredge vs. egg: Olive oil gives you a lighter, crispier coating. If you prefer a thicker, richer crust, swap in one beaten egg instead.
- Olive oil spray: Lightly spritz the coated tenders with olive oil or avocado oil spray right before baking. This helps the panko brown evenly across the whole surface.
- Let the breading set: If you have 10 to 15 minutes, chill the coated tenders in the fridge before baking. The coating adheres better and holds up during baking.
- Pat the chicken dry: Before dredging, pat each tender dry with a paper towel. Moisture is the main reason breading slides off during baking.
- Seasoning swaps: The base blend works any night of the week. Try za’atar for a Mediterranean twist, Italian seasoning for an herb-forward version, or a pinch of cayenne if your family likes a little heat.
- Doneness: Chicken tenders are cooked through when they reach an internal temperature of 165°F. A quick-read thermometer takes the guesswork out completely.
Nutrition
Nutrition information is automatically calculated, so should only be used as an approximation.


For some reason these tenders are the BEST. People always ask “how did you make these”? They are juicy, tender, and perfectly seasoned. Thank you for this recipe.
I am so glad to hear this!
This worked exactly as written, thanks!
So glad!
So glad you liked it!
Made these for a quick dinner for my toddler and I. Definitely adding them to dinner rotation! So good!
Followed exactly how written
I am so glad that you liked them!
I use a mix GF Panko & breadcrumbs for the crust
Love that idea!
Nicely seasoned! Made exactly as written.
So glad you enjoyed them!
This came out really yummy. I reduced the fat by using egg instead of olive oil. I suggest doubling the seasoning to make it more tasty but overall 4 out of 5 stars for me.
I am so glad you enjoyed them! I like the idea of doubling the spices!
This is a repeat for me
Easy
So glad!
My family loved this!
I am so glad!!
I appreciate the background you included. It adds depth to the recipe
I am glad it helps!